
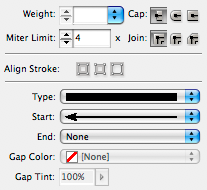
I began by inserting a page break to show where the article began and ended. This was done by selecting the 'line tool' and drawing it across a column. I then selected the 'yellow' swatch so that the line would be yellow and therefore clearly show that the article had began and then finished. I then selected the 'stroke' panel to add the small squares to each end of the line, the screen grab below shows the stroke panel, to add the small squares I changed the 'start' and 'end' drop downs to square.

Above is the finished page break, I placed one at the start of the article and one at the end.
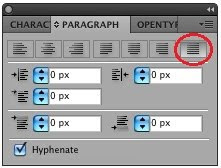
Once I had successfully inserted the page breaks I decided to 'Justify' my text, as when each line finishes at different places it looks un-professional and therefore does not follow the convention of most music magazine double page spreads. To justify my text I selected the 'Paragraph' tab, and chose the straight edge selection, which has been circled below.
No comments:
Post a Comment