Monday, 7 February 2011

DPS Near Completion

This is my current stage of the double page spread. I have almost finished apart from a few small things to complete or change.

From here I have added the other page number in the bottom right, which says 'The Mix P18'. I decided to add the second page number so that it looks more genuine and professional, as other magazines number every page. I followed the same process for this as the last page number I created. This was using the font 'Jailbird Jenna', and changing 'The Mix' to red and the 'P18' into white. I then added a drop shadow to the text to make it look more defined. To finish the process I saved the text as a PDF and 'Placed' it into Indesign.

Saturday, 5 February 2011

DPS Current Progress Four

Continuing with my double page spread I soon found a problem.

After I had placed another photo into the bottom left of the page I 'placed' my article into the double page to see the spacial area I had to work with. As the main photo is large and takes two columns not all of my text would fit on the pages, this caused me to delete the smaller picture found in the bottom left so that I could fit all of my interview on the page. At first I was rather hesitant to do so but once the text was in place I believed the double page looked more organised and had a nice flow to it.

Once I had arranged the text into suitable columns I then had the freedom to choose the font and colour. I wanted to continue the house style by using red, black and white colour text, due to having a black background I decided to use red for the question asked, and white for the response. To change the colour of the text you simply highlight the desired text, select 'swatches' and then the colour you want, which is done by creating a swatch first and saving it to the swatches tab.

Once the colours had been chosen and applied, I decided to find a suitable font for the text, I wanted to use a bold font for the questions, and a simple font for the answers. The bold font used for the questions is effective as it highlights which are questions and stands out from the black background, which will hopefully catch the readers eye. I chose to use 'Arial' for the answers, as it is very easy to read, and can be seen as a different person talking as it is in white and looks totally different to the bold, red text used for questions. For the Introduction and conclusion to the interview I used the font 'Santa Fe LET', I used this font for the second line of the title and believe it is original, and therefore an effective text to introduce the reader to the article and to conclude the article.

I also decided to add a 'Pull quote' to the article, this is the text saying "Now I earn out of what I was born to do", I decided to add this as it shows the reader a quick insight into what is in the article, as it is a larger and different font to the rest of the text. The font used for this is 'Jailbird Jenna', which I have used through-out the magazine for various parts of text. I wanted to use a different font for this pull quote as it has to stand out from the rest of the text to work in attracting the reader.


Friday, 4 February 2011

Adding The Page Number

Whilst looking through many music magazines, I thought adding the name and page number to the double page would be useful as it would follow the magazine convention, as every magazine has page numbers.

I created this by using Photoshop, as it easier to edit the text and 'place' it into Indesign as a JPEG, because then you can move it to the desired place easily. I chose to use the font 'Jailbird Jenna' once again as I used for the page numbers on the contents page, and to keep the consistent house style I opted to use it again. I chose to have the magazine name in red and the number in white so the reader can quickly see the page number from the other text. I decided to add the magazine name as I believe it is unique, and just adds that original touch to the page.


DPS Current Progress Five

The next step was to add a few small touches to the page, mainly to make it look more attractive and professional.

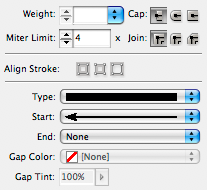
I began by inserting a page break to show where the article began and ended. This was done by selecting the 'line tool' and drawing it across a column. I then selected the 'yellow' swatch so that the line would be yellow and therefore clearly show that the article had began and then finished. I then selected the 'stroke' panel to add the small squares to each end of the line, the screen grab below shows the stroke panel, to add the small squares I changed the 'start' and 'end' drop downs to square.


Above is the finished page break, I placed one at the start of the article and one at the end.

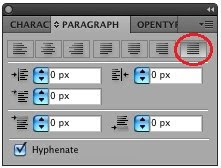
Once I had successfully inserted the page breaks I decided to 'Justify' my text, as when each line finishes at different places it looks un-professional and therefore does not follow the convention of most music magazine double page spreads. To justify my text I selected the 'Paragraph' tab, and chose the straight edge selection, which has been circled below.


Thursday, 3 February 2011

Adding Text To The Picture

When looking at my double page spread I realized that I hadn't actually mentioned my artist's name. I had to change this so I decided to put 'The Ed-Master' at the top of the photo I had placed into the page earlier.

I decided to use the same font as the title of the double page, this was so that it matches and looks more attractive to the reader. I inserted this text using Indesign instead of Photoshop. This is because I did not want any effects to the text, so using the text tool on Indesign was sufficient for this. I changed the fonts to 'Jailbird Jenna' and 'Santa Fe LET', as well as having the top in red and bottom in white, therefore it matches the style of the title.

Tuesday, 1 February 2011

Adding The Photo To Indesign

After editing the photo in photoshop I had to import it to the double page on Indesign.

I began by selecting 'place' and choosing the file I wanted to import as I did with the other photo. Once the photo was on Indesign I had to re-scale it so it fit into one column and around half the height of the column. I also cropped some of the photo as there was blank space which was not needed.

I added this photo so that the reader can see how the artist has been poor (photo on right) and how he is now rich and famous, as the photo just added shows more formal clothes which indicates his wealth.

Editing Another Photo

This the second photo I added to the double page spread.

The background of this image was originally white, and I wanted to change it to black so it would not be seen on the double page, as the background is also black.

I made the background black by selecting the 'Paint Bucket Tool' and then changing the 'colour picker' to black. Once these were selected I simply clicked on the background and it went from white to black.

I also edited the exposure slightly, so that the image would look brighter. I changed the exposure to +0.50 so that the image was clearer and will stand out on the double page more effectively.